Commitment to Safety
Team Ánemos is committed to building the New Rice Wind Tunnel the right way—with the safety of the user and operating environment as the top priority.
Design
Team Ánemos will incorporate an extensive suite of mechanical and electrical safety design features to guarantee the safe operability of the tunnel.
Documentation
Robust documentation and a well-defined maintenance plan will help the New Rice Wind Tunnel continue to benefit the Rice community for decades to come.
Regulation
Working with Rice University Facilities and Capital Planning (F&CP), Team Ánemos has obtained official approval for Egress, HVAC, and OSHA considerations.
Analysis
Team Ánemos has conducted a full Failure Mode and Effects Analysis (FMEA) study on the New Rice Wind Tunnel to facilitate a safe and clearly-defined user environment.
The New Rice Wind Tunnel
Key Performance Specifications
Dive into the key performance metrics that set the New Rice Wind Tunnel apart—and what motivated Team Ánemos to strive for them.
23.1 ft. Long
6.3 ft. Wide
8.6 ft. Tall
Flow Rate
0–22 m/s (0–50 mph)
Precise control of wind speeds between 0–50 mph enables meaningful real-world conditions for research and engineering design.
Test Section
48″ x 48″ x 96″
Large test section volume allows for diverse testing possibilities while helping to maintain a laminar flow profile.
Motor Power
75HP
Running off 460V 3-phase AC power, the VFD-driven electric motor can comfortably and efficiently modulate the fan to achieve the desired flow rate.
Room Size
24,725 ft^3
Large room volume not only reduces static pressure loss, but allows for egress and HVAC requirements to be safely met.
Section Modularity
The New Rice Wind Tunnel is comprised of five modular sections, each with its own important role. The sections are constructed individually, and are easily separable for ease of maintenance and repair.
Follow the direction of airflow below to learn more!
1
Settling Chamber
The entry point of airflow, the settling chamber consists of a honeycomb flow straightener and two metal screens, playing a crucial role in producing laminar flow.
2
Contraction Cone
After exiting the settling chamber, the air enters the contraction cone, which then funnels it into a smaller area to increase speed and decrease turbulence.
3
Test Section
True to its name, the test section houses the object of the experiment being conducted.
4
Diffuser
With a unique shape that transitions from a square into a circular outlet, passing through the diffuser allows the air to regain static pressure, reducing demand on the fan.
5
Fan
The fan is the heart of the wind tunnel, moving large volumes of air to achieve the user’s desired flow rate.
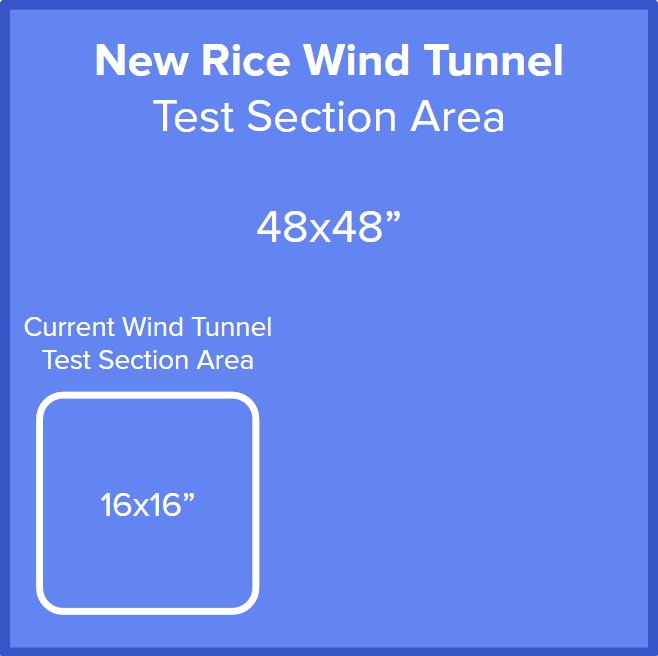
Test Section Comparison
With the shortcomings of the current wind tunnel in mind, including a much larger and more versatile test section was a top priority for Team Ánemos. At 48×48″, the testing cross-sectional area of the New Rice Wind Tunnel is 9x larger than that of its predecessor.
This test section will not only allow for greater testing possibilities and superior visibility, but also improve the laminar quality of airflow by reducing the impact of unwanted boundary layer effects.
Fan Selection
Static Pressure Model
The fan was the most critical component of the tunnel, as it provides the airflow needed to conduct tests. To select a fan, our team needed to learn how the tunnel shape, wall friction, and flow straightening elements, and other tunnel features would affect the pressure inside the wind tunnel. This was accomplished using Bernoulli’s equation with additional terms for minor losses (obtained from research and correlations for screens and honeycombs).
Our team chose to illustrate this relationship with MATLAB, in which we solved for the static pressure distribution throughout the tunnel. This model of the pressures through the tunnel became a very useful design tool as we designed our tunnel and selected the fan.
System Curve
Our system was designed to operate with a maximum flow speed of at least 22 m/s inside the test section, corresponding to a volumetric flow rate of roughly 70,000 cubic feet per minute. We collaborated with our partners, HVAC supplier Knape Associates and OEM Hartzell Air Movement, to match our system curve to an excellent fan which could meet our flow rate and fan power requirements.
Key Fan Specifications
Fan Diameter
61″
Flow Volume
70,000 CFM
Static Pressure
2.6 in. wg
Operating Power
53 HP
Controls and Instrumentation
Wind Speed Modulation
Our primary goal is to measure and precisely control the instantaneous wind speed within the tunnel for highly calibrated and informative tunnel tests.
We use a pitot-static tube within the tunnel to measure the difference in static pressure and dynamic pressure caused by the movement of air through the tunnel. This differential pressure is routed to a highly precise differential pressure sensor that interfaces with our controls system to read in and process the data to derive a wind speed measurement through Bernoulli’s principle. We then employ a tightly calibrated Proportional-Integral-Derivative (PID) software control loop to perturb the RPM of the tunnel’s fan based on the magnitude of the difference between the measured wind speed and the user’s desired wind speed. This guarantees that the tunnel accurately supports the user setpoint for wind speed.
Data Collection
Another key feature of the New Rice Wind Tunnel is its integrated data-collection system. Prior to a test, the user will have the ability to specify both the types of data to be recorded as well as the period of time over which the recording will take place. Subsequent data collected over this testing period will be automatically time-stamped, formatted, and uploaded over the local network to a location which the user can then digitally access and download from in a seamless manner.
The New Rice Wind Tunnel
A Wind Tunnel for the 21st Century
Sponsors and Partners